StudioC Astro Imaging
| Home | Gallery | RobServatory | Equipment | Astro Links | Astronomy News | Legal Stuff |
|
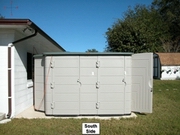
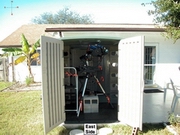
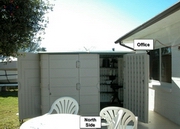
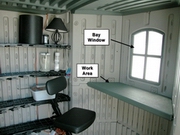
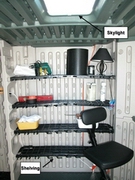
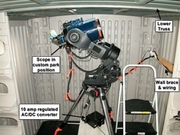
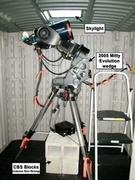
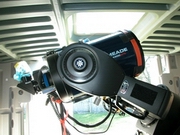
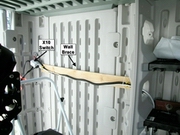
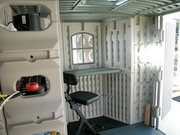
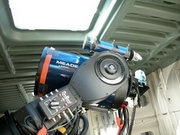
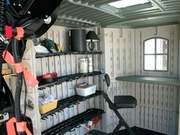
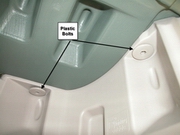
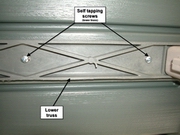
The My "RobServatory" (OK it is a silly name but my wife and kids get a kick out of it!) saw first light on 12/22/05. I connected my SBig ST7XME CCD camera but I did not do any imaging that night as the seeing was bad and I was more concerned with getting everything setup and verifying the "system" was usable. I polar aligned the scope and made sure everything was working. I did spend a little time at the scope and I was able to catch a visual glimpse of a few DSOs. Even with the quick polar alignment the gotos were very close to dead on. I have been wanting a permanent pier and observatory for some time but have not had the money to buy a prefabricated observatory and no time to build one myself from scratch. Between bad weather, working too much, and having to move and setup my scope each time I wanted to star gaze or image, I had not spent a night pursuing my hobby for several months. with an observatory and permanent setup I am hoping to alleviate at least one of those excuses. One day while at our local Sam's Club, I saw a backyard utility shed that looked interesting. The shed I looked at and eventually bought is called the "Smart Shed Deluxe" made by "Thinking Outside". It is 11' L x 7' W x 6' 7" H and costs ~$800. It is very simple in its design and it seemed that with a little tweaking I could make it into a decent observatory. The shed has temporarily been erected on my back porch. I originally meant to take photos of the shed being assembled but with my Dad's help, it went up so fast and easy that it was done in about 2.5 hours and I didn't remember to grab the camera until it was completed. My long term goal is to get a permanent pier and a concrete slab put in on the south side of my porch. Then I will move the shed to the new slab and pier. Until that can be done, the scope is sitting on its tripod inside the shed. The floor is fairly heavy duty but does not sit completely flush in all places with the underlying porch. I have placed several CBS blocks under the tripod to help prevent flexing of the shed floor. Not an ideal imaging setup but again this is temporary. There are two separate main roof panels and the walls are 6' 7" high and there are no gabled ends to get in the way. Once the roof panel is removed from the East end of the shed (portion furthest from the house) I am left with a covered area for me, my laptop, and other equipment. The "Bay Window" faces the window of my office and I can sit inside the house at my desk and look into the shed. I will be able to use Windows Remote Desktop function to control the laptop from inside the house (think warm in the winter and no mosquitoes in the summer). I can also remote control the light in the shed using X10 technology and have a "kill" switch on the scope if things go awry. I like to turn on the light and be able to see the scope while it is slewing just in case cables get tangled or the scope decides whatever I am slewing to is below the horizon. The scope sits at the western end of the shed and has as clear a view of the sky as is possible from my backyard. The limiting factor being the trees and houses not the shed walls. Removing one roof panel is relatively easy, I loosen 6 screws from the lower truss support and then remove 6 plastic bolts from around the perimeter of the roof panel. I push up on the panel then back to release it from the grooves it sits in, then I lay the edge up on the remaining section of roof and slide the panel back over it's mate. The panel slides back rather easily but I have to be careful not to damage the skylights. Once slid back, the panel appears heavy enough to stay in place unless the wind gusts pretty strong. I plan on trying to add some sort of guides and a tie-down so I do not damage the roof panels or skylights. I am thinking some PVC pipes affixed to the top of the western roof section may be what is needed as guides. I'll need to look into it... (Note the images below all show both roof sections in place.) After removing the roof panel the only thing holding up the eastern corners of the shed are the doors. This left the doors and corners very wobbly and subject to collapse and damage. I screwed a 1" x 4" board from the South side center brace to the South East corner to add a bit of rigidity to the structure. This also gave me a good way to route my AC cord to the scope and the cables from the scope and camera to the small work area counter under the bay window where the laptop will sit. There are only a few negatives that I have found with this shed. The biggest problem is that it would not take much to break into it. While I am OK with leaving the scope in the shed while we are home, I am keeping the eyepieces, CCD, laptop and other expensive and easily stolen items in the house when not in use. I figure anyone breaking into the shed would have a heck of a time stealing the scope itself without disassembling it. When we go away on vacation I will take the scope in the house to secure it. The other issue seems to be a small amount of water intrusion around the doors when it rains really hard. Right after we setup the shed we had a couple of days of heavy rain and I noted some water leaking down the center supports near the doors. I am going to look into adding some seals around the doors to help make them a bit more water and bug tight. When not in use the scope and all electronics will remain covered to keep out any water or dust. So far I am very pleased with this shed. Although not originally designed to be an observatory I think it will work out well with a bit of tweaking. And for the price I think it is a real bargain as far as "observatories" go. Besides, if I ever get a "real" observatory I can always relegate this shed to housing my lawn tractor and yard tools. Click for a larger image
|
| Home | Gallery | RobServatory | Equipment | Astro Links | Astronomy News | Legal Stuff |